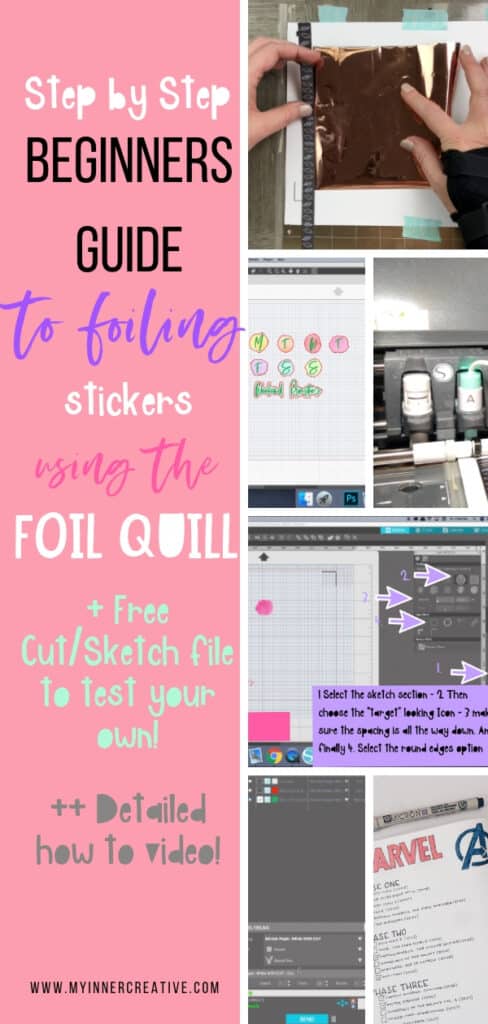
The step by step guide to using your Foil Quill for Stickers
(Supplies and free cut file are all included at the end!)
I was totally ecstatic when my new foil quill arrived! I had been waiting for a simple way to foil my stickers for the longest time. Whats frustrating with the standard way of foiling is that the foil needs to bind to toner, so you need a laser printer – and for the stuff you dont want to bind to it – you need to print it with an ink jet.
So TRICKY!
So when I opened my package – I discovered that boohoo – I couldn’t use it – that, or I was totally dumb. Which really I didn’t think I was. I stupidly though it was a plug and play type deal.
So after tonnes of wasted sticker paper, and tonnes of foil later – I finally worked it out! And I am hoping that this helps you too! If you want to see some of our other “how-to’s you can find them here!
What is the Foil Quill?
The foil quill is an adapter connected to your cutter, which heats up, and then transfers foil by heat to the medium you are wanting to foil. Which means, not only does it foil to paper – but it also foils to Leather, Wood, or any surface compatible with your type of cutter.
Whats in the Foil Quill box and where can I get one?
You can buy the foil quill from scrapbook.com and it comes in a set of 3 – you can buy them individually but its a good idea to get all 3! If you are only going to buy one – I highly recommend the medium tip.
So in the box you get:
- the 3 tips – small medium and large
- 4 cutting machine adapters (Silhouette, Brother, Cricut, and Sizzix)
- 3 heat activated 6″ rolls of foil (gold, silver, rose gold)
- 1 roll of placement tape
- 1 heat resistant plate
- Instructions
Now lets be clear – the instructions only tell you how to insert the quill correctly and once ready send your file to the printer in a sketch format. Hmmmmmm……
So if you are familiar with silhouette America as a brand, you go in, and you usually cut things. So when they say – send a file – it sends it in the same outlined format of a cut file, and the quill will only move over the areas that are marked as cut areas!
The adapters however work with a range of cutting machines
- Cricut Maker
- Cricut Explore Air
- Cricut Explore Air 2
- Silhouette Cameo 1
- Silhouette Cameo 2
- Silhouette Cameo 3
- Silhouette Portrait
- Silhouette Curio
- Sizzix Eclips 1
- Sizzix Eclips 2
- Brother DesignNCut
- Brother ScanNCut DX
- Brother ScanNCut (CM650WX, CM350, CM100DM, SDX125, SDX225, SDX125i)
And you can foil onto the following materials! FUN RIGHT!
- Paper
- Cardstock
- Bookboard
- Vinyl
- Acetate
- Vellum
- Leather
- Wood
Total game changer!
You can also grab that cool magnetic mat from Scrap book.com and I will list all the supplies at the free cut file at the end!
So how can I make foiled stickers with my foil quill?
I googled high and low for people to tell me how to do this! I couldnt find someone who showed me from start to finish how to do these things. They either had the start end – of installing – but missed out the “how do I make a solid line with my foil quill” end, and straight into the foiling.
So I decided to change that, but creating this step by step how to!
You can watch the video below – or we spell it out for you step be tedious step!
Step 1 – Setting your design up for foiling with the foil quill
Make sure you have opened up your registration mark section and expanded it – only on the top 2 rows all the way to the lowest amount
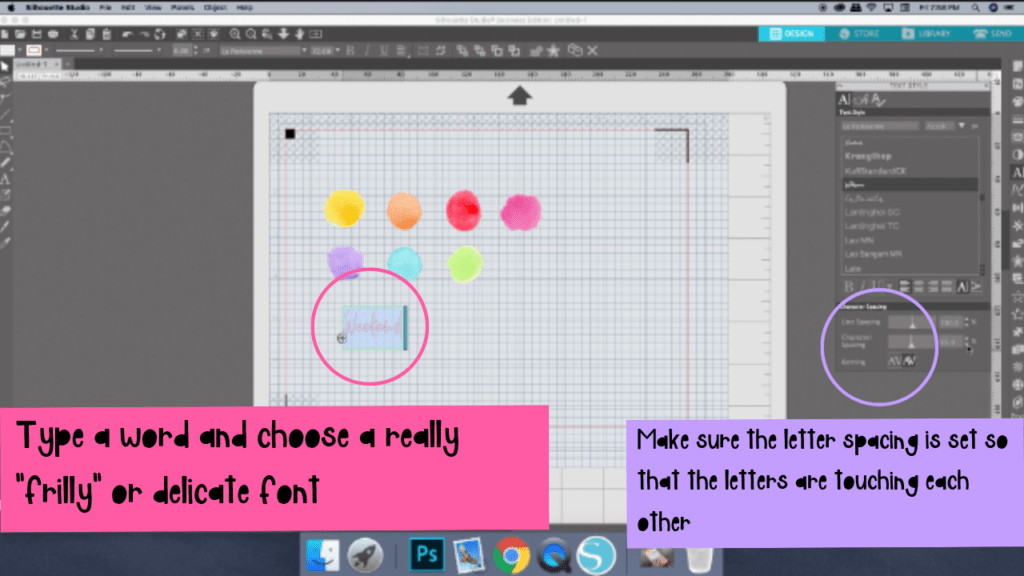
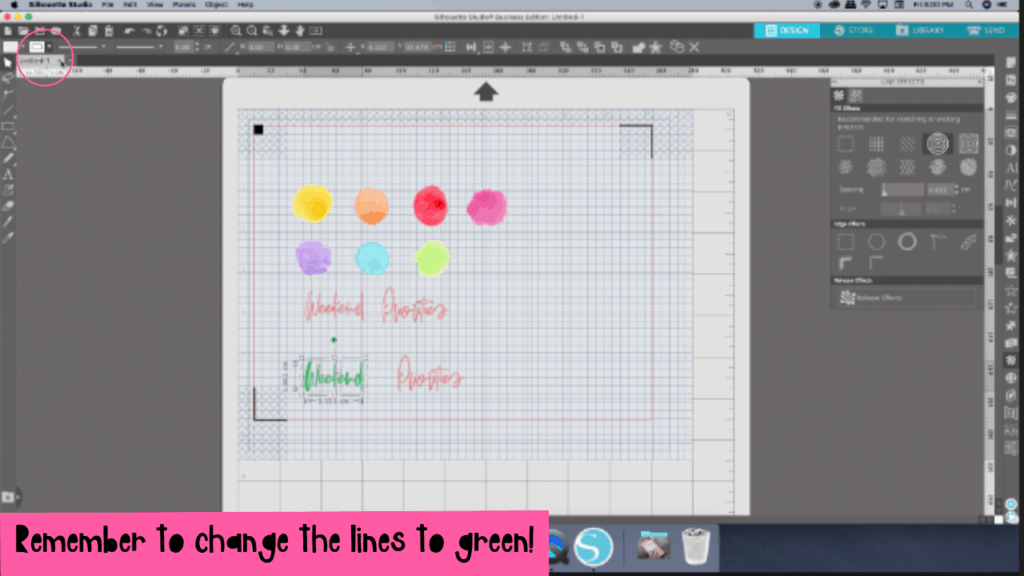
Write in the word you want to use – using a really delicate/frilly font that usually would create cut lines around the word. Make sure the kernling is correct by adjusting how close the letters over lap or touch each other, they need to touch for a nice solid line.
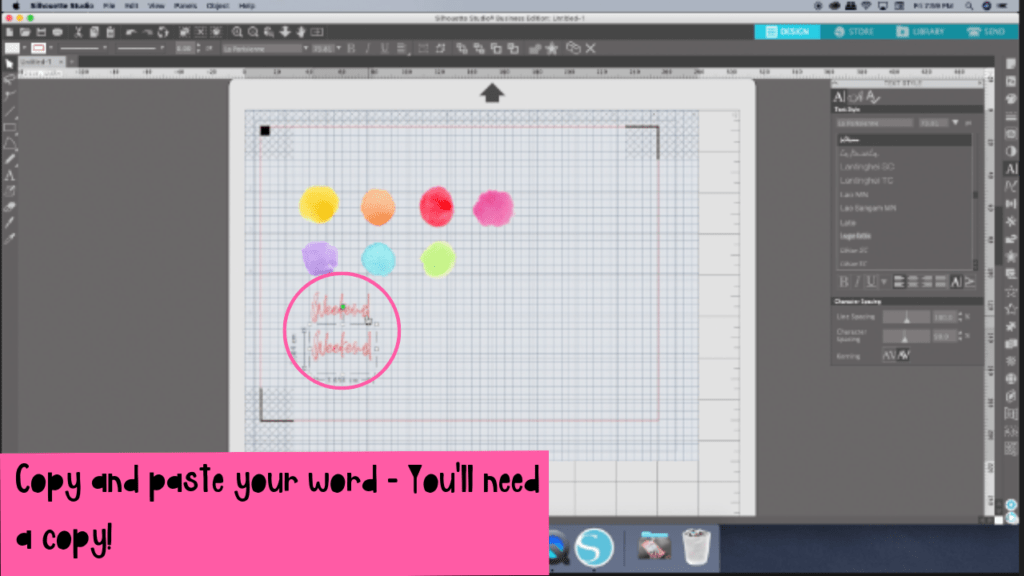
Now duplicate by cutting and pasting the word
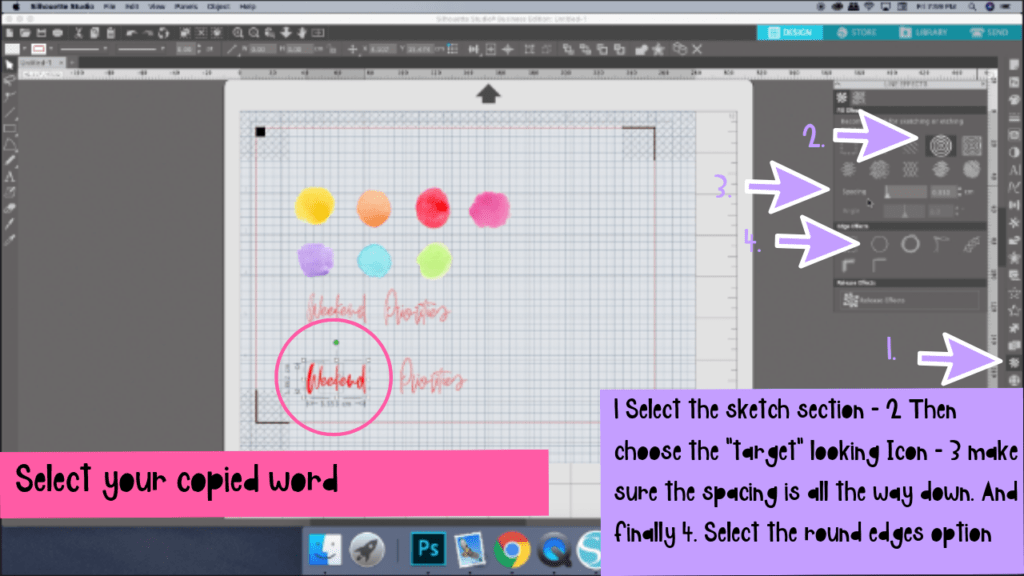
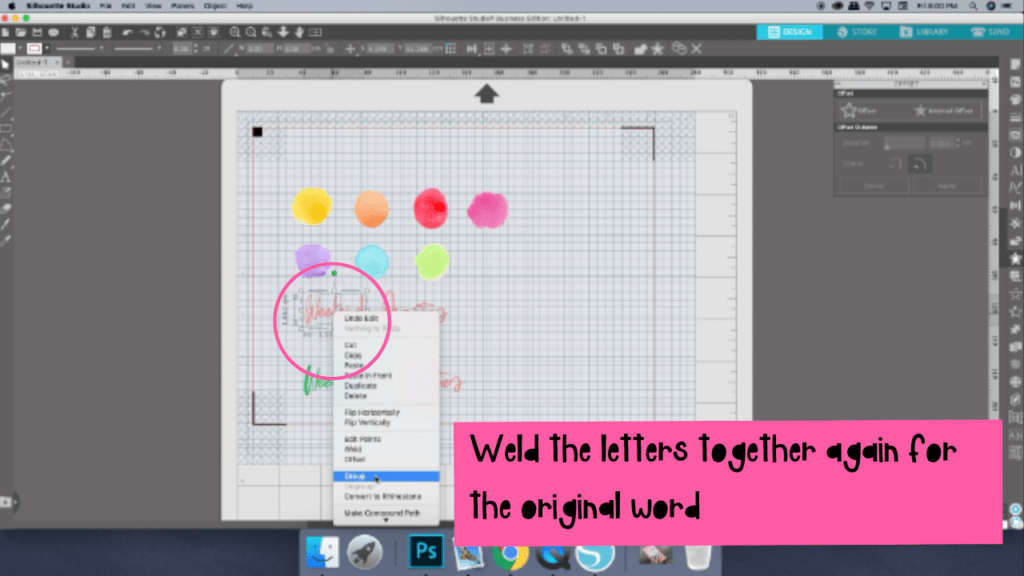
Now go through and ungroup the letters, go ahead and weld the letters together so they are a solid unit. Once the word is welded together – head over to the sketch tool, and select the image that looks like a target. Move the size slider all the way down to the lowest number. Finish off by clicking the rounded edge tool.
Change the “cut Line” colors to green so you can see what is foiled and what will be cut.
Again – ungroup and weld the letters together. This time include a buffer around them, making sure the whole word is captured. Delete the cut line word from the center.
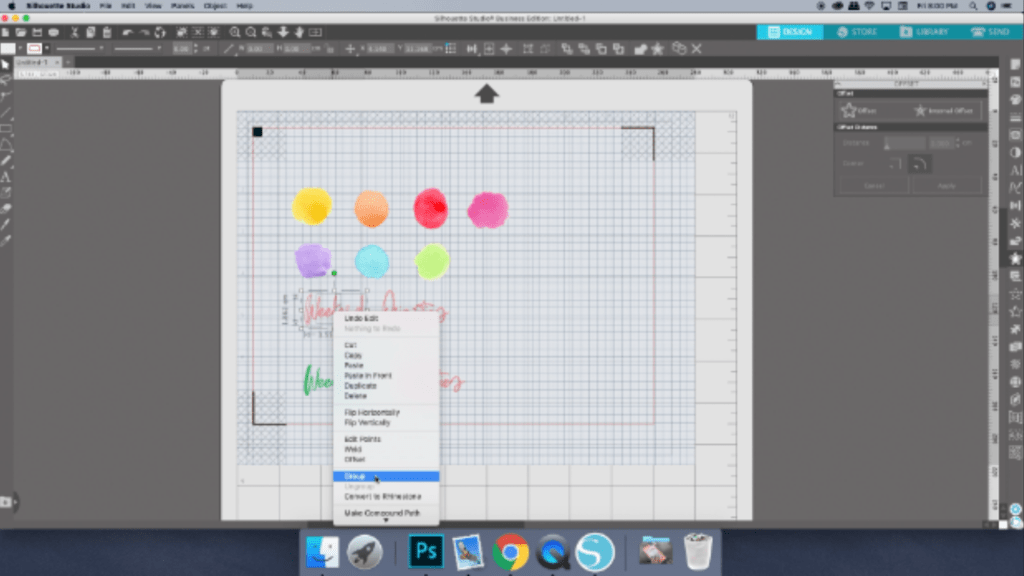
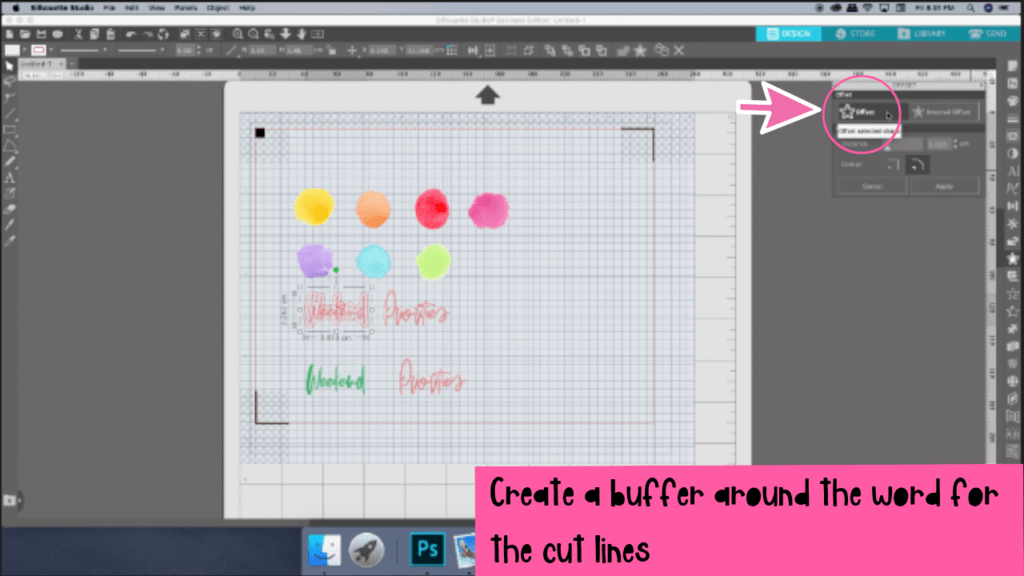
Delete the cut line word from the center and replace it with your green-fill foil wording.

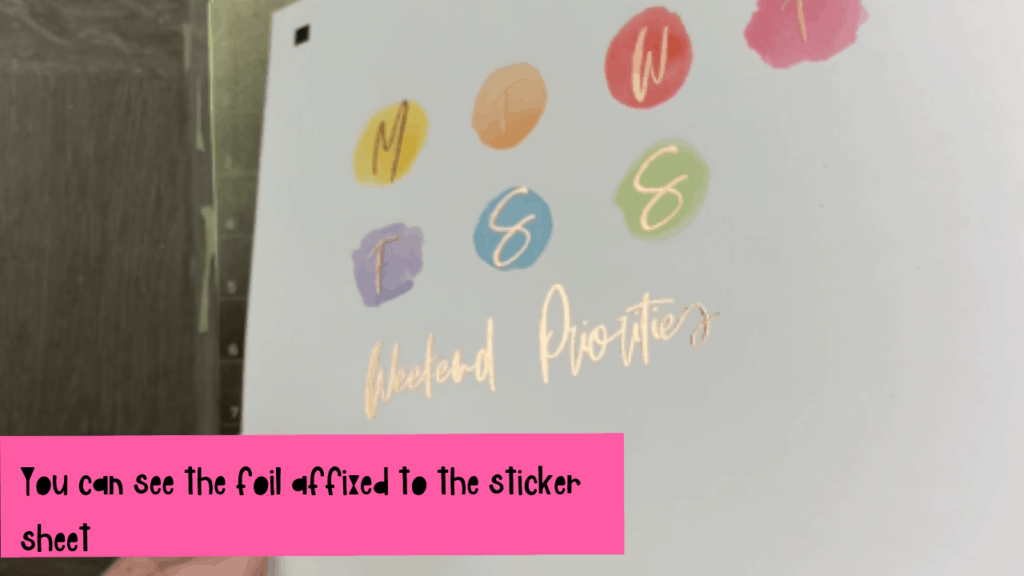
Print your sticker sheet out on your sticker paper of choice.
Installing my Foil Quill into my Silhouette Cameo
This is pretty straight forward as my instructions showed how to do this with each adapter.
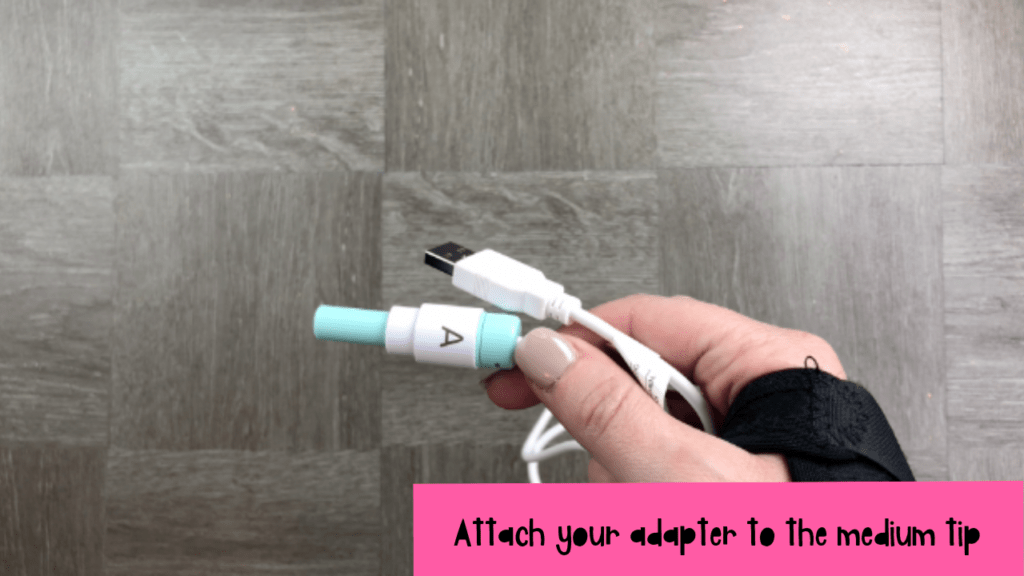
Attach the adapter to the MEDIUM foil quill.
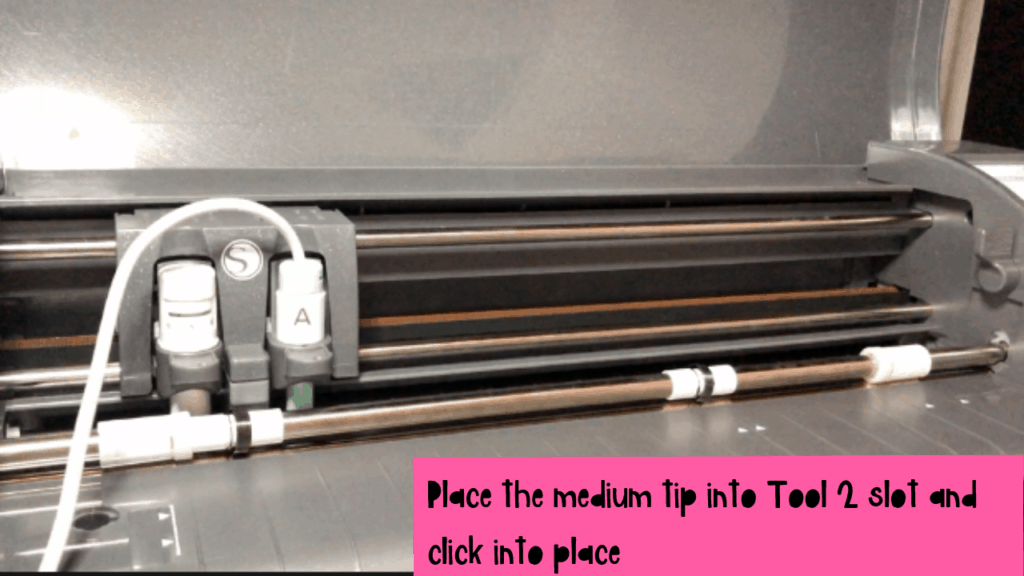
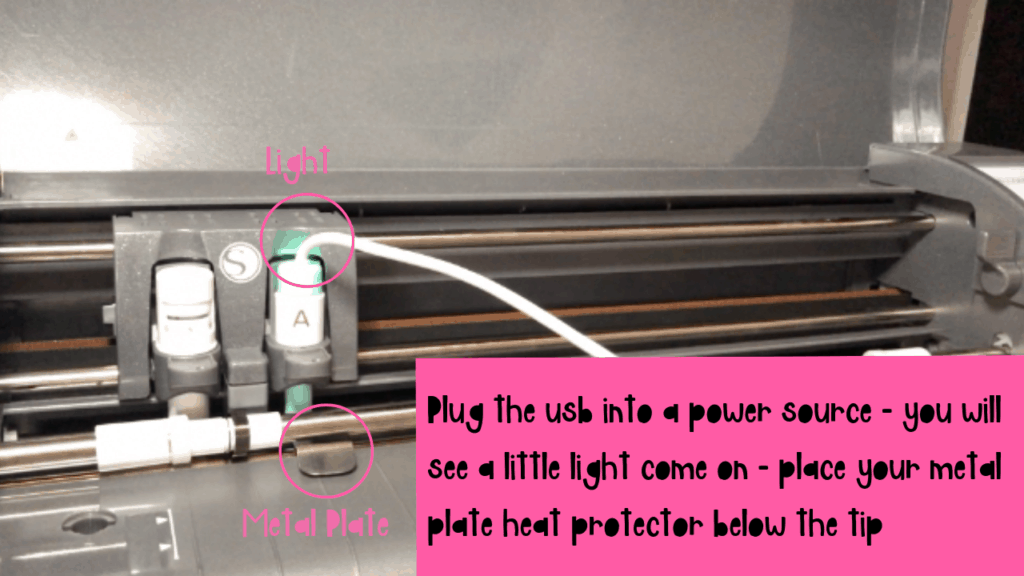
Pop this into tool 2 on your Cameo 3. Click it/ lock it into place/ Place the protective heat plate below it and plug the USB into the power point
DO NOT PLUG IT INTO YOUR CAMEO
Once turned on a little light will appear – it takes about 5 mins to heat up to about 75 degrees celsius
Preparing your cutting mat for foiling:
This needs to be really really precise!
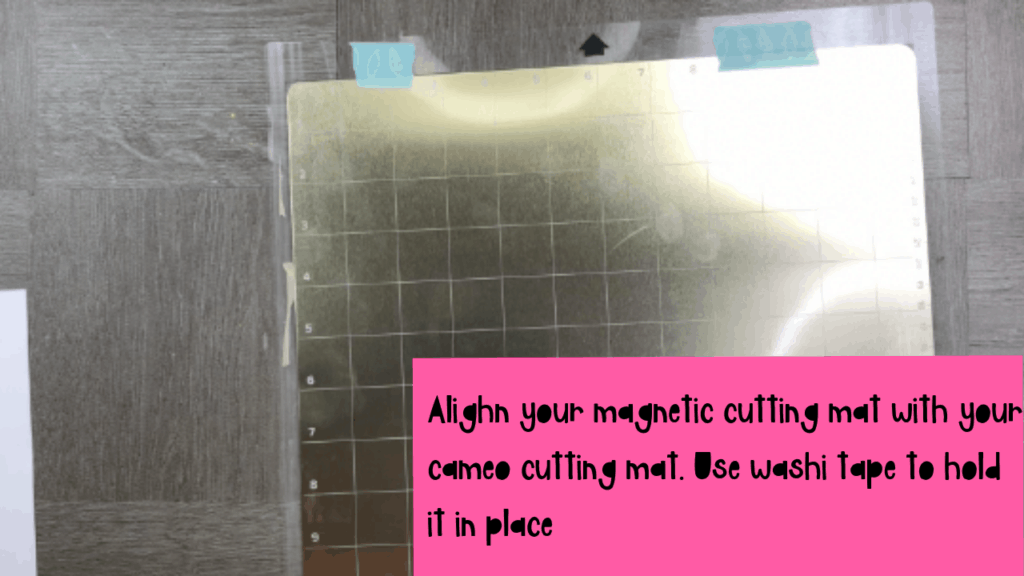
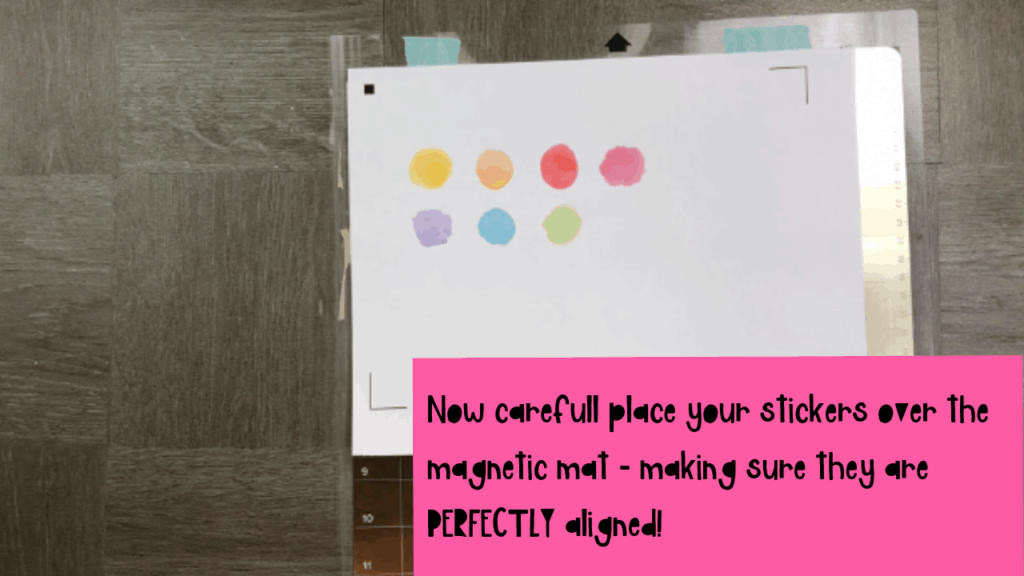
First align your magnetic mat with the cutting mat, use washi tape to stick them together. If you dont have the magnetic mat, just use washi tape to stick everything down instead of magnets!
Align your printed sticker sheet with the cutting mat and the magnetic mat. This NEEDS TO BE EXACT!
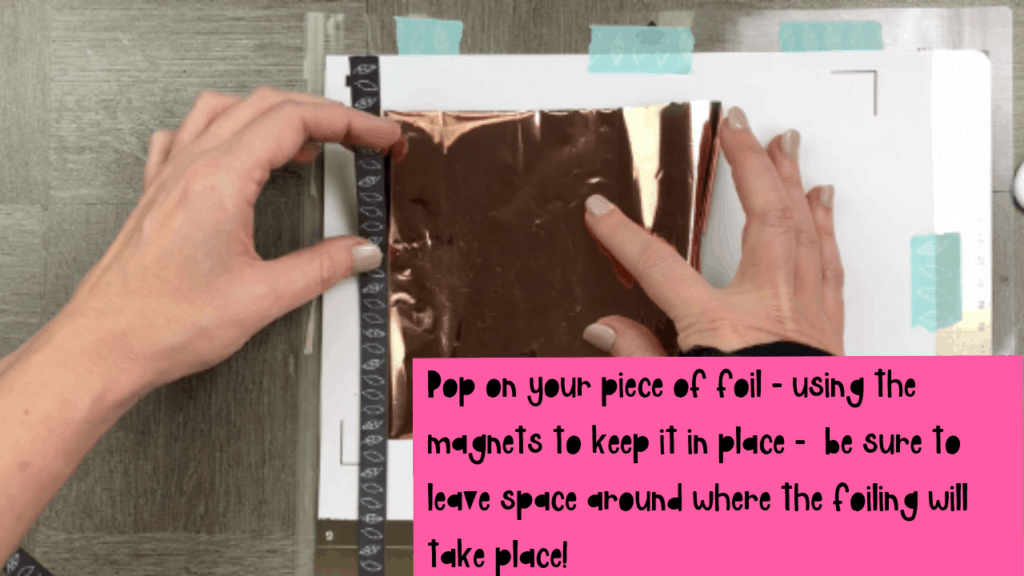
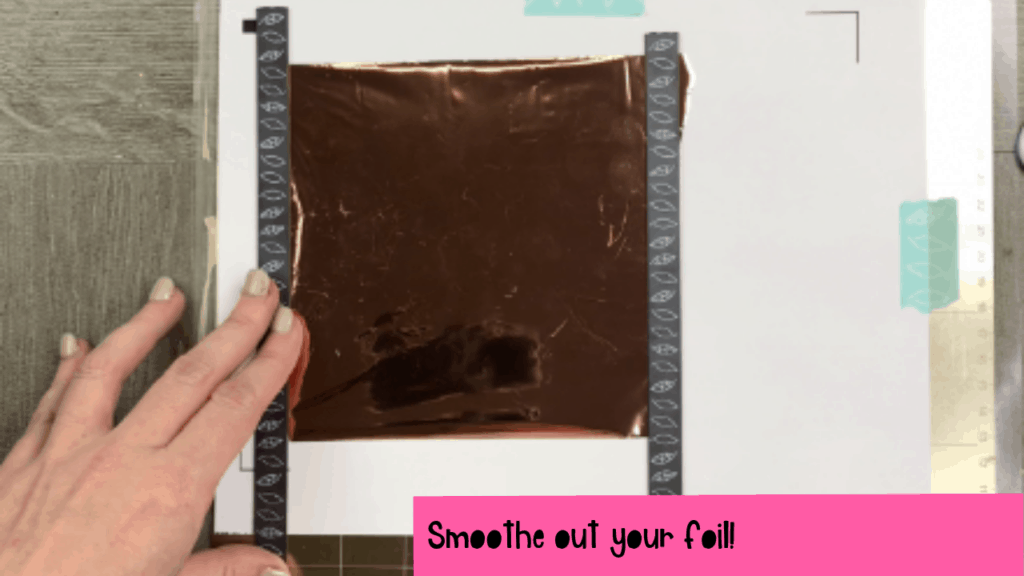
Pop your foil down using the magnet (or washi tape) and then smooth it out and then also stick down the bottom area. Dont put anything up top as your cutter and pen holder needs to move over that space.
Getting ready to foil!
Before hitting the send section button – head over to the paper choices and DESELECT your registration marks. For foiling it bumps into the magnets – if you have washi tape instead – go for gold! But if you are using magnets deselect the registration marks!
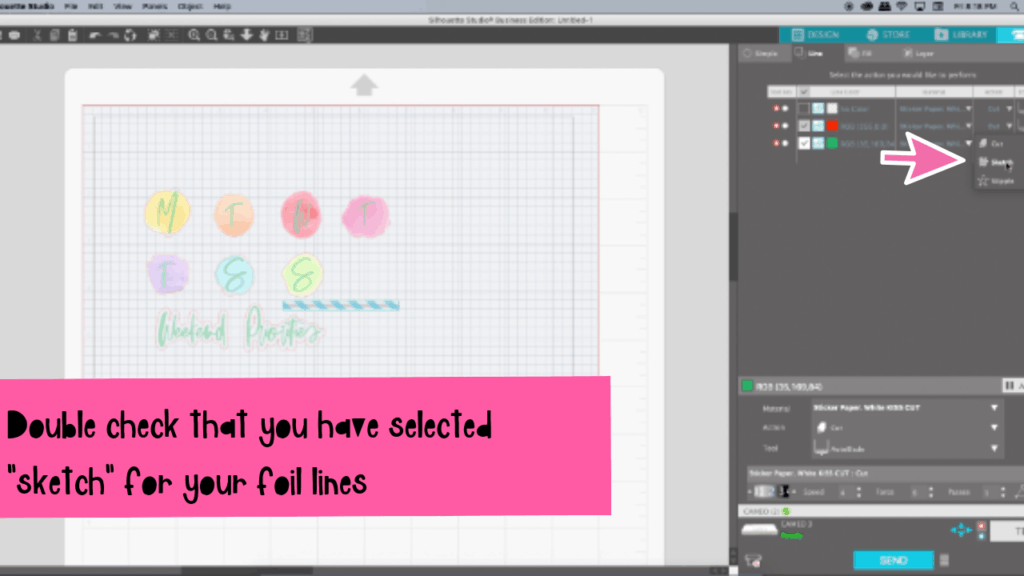
Select the “Line” option in your send section. You need to have only green and red lines, green will be foiling and red will be cut lines!
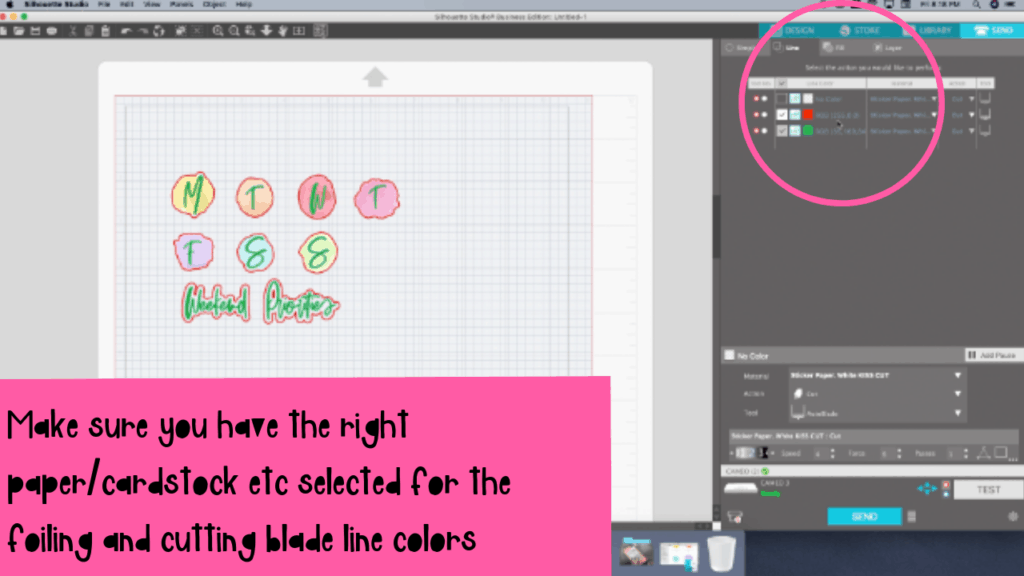
For your green foil line – make sure you have selected the “sketch” option on the drop down menu.
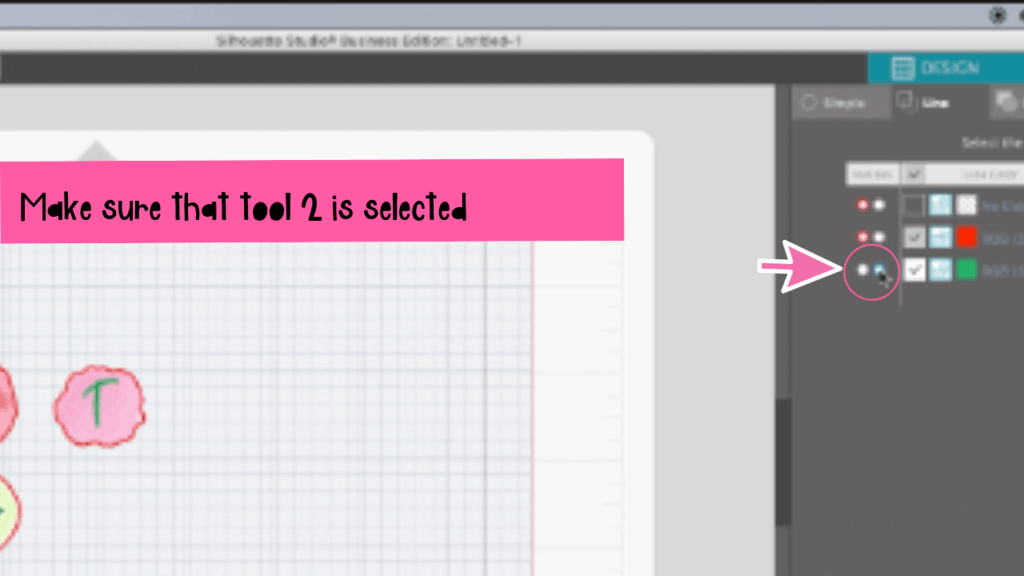
Now go ahead and turn off the cut line/ red line as you will only be looking at the foil line for now.

Double check that you have selected tool two as the one doing the foiling!
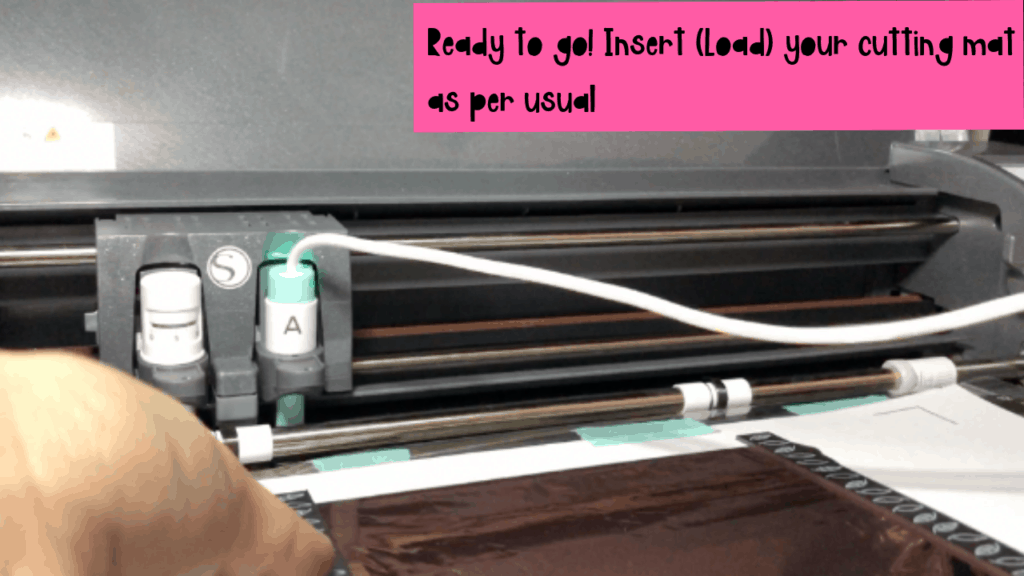
Its now time to send it to the cutter! (My Silhouette Cameo 3! YAY!) Load it as you normally would!
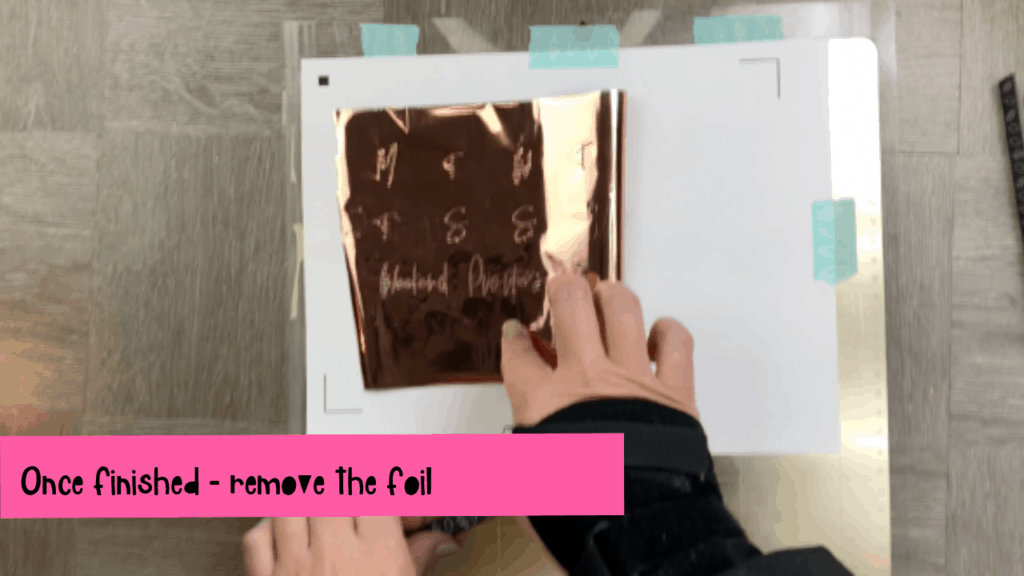
Finishing off your foiled stickers
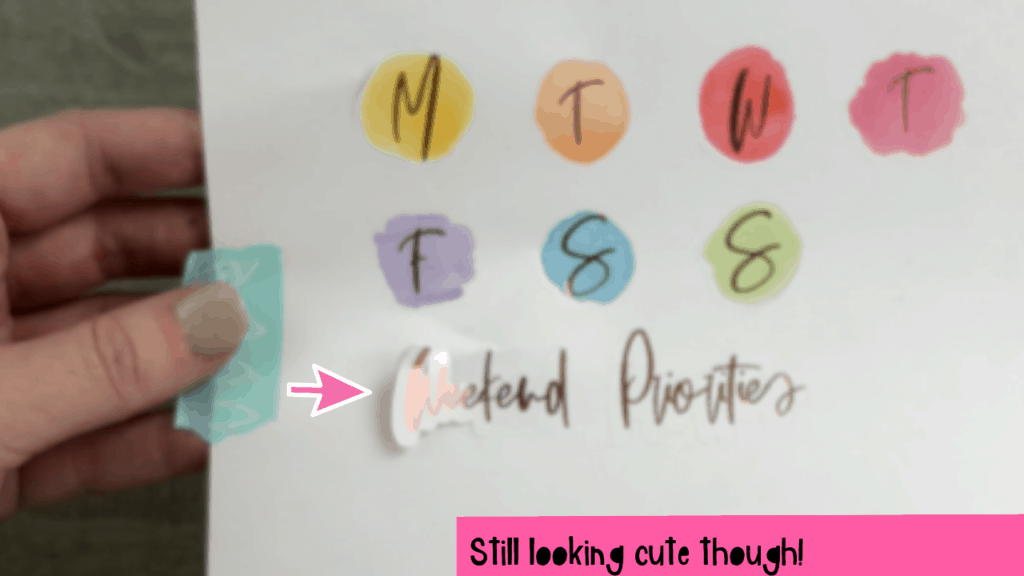
Now that your foiling is finished, remove the foil from the sticker sheet. This is pretty easy! This is because it is not “stuck” or bound to the ink that lasers have (toner based foiling)
I ran into a snag! Here you can see how important it is to make sure you have everything aligned is. Once something is out of line – everything is. You can see I didnt line my edge right up to where it should have been – so all my cut lines were out by that much too.

But! They still came out pretty well and I cant wait to make more – ones that are slightly more practical 😛 haha!
Please let us know if you found this useful and feel free to tag us on instagram so we can see how you go on! Tag us @myinner.creative 🙂
Free Foiling and Cut file to test! Click Here